
TS to JS 코드 연습 사이트 [Typescript Playground]
이전강의 보러가기.
2022.06.15 - [IT] - [Nomad Coders] TypeScript로 블록체인 만들기 #3 정리
[Nomad Coders] TypeScript로 블록체인 만들기 #3 정리
#3 FUNCTIONS #3.0 Call Signatures 위에 있는 것이 Call Signatures type Add = (a:number, b:number) => number; const add:Add = (a, b) => a+b 이런식으로 Signature type을 만들 수 있음. #3.1 Overloading..
ella-devblog.tistory.com
#4 CLASSES AND INTERFACES
#4.0 Classes
ts에서 object oritented 구현
ts에서 class 만들기
class Player {
constructor (
private firstName:string,
private lastName:string,
public nickName:string
) {}
}
const nico = new Player("nico", "las", "니꼬");
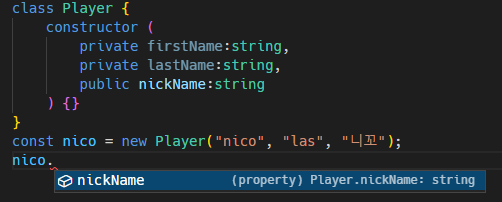
private 객체에는 접근 불가. 클래스 안에서만 접근 가능
위 코드를 js로 바꾸면
this.firstName = firstName;
this.lasName = lastName;
this.nickName = nickName;
이렇게 private인지 public인지는 모름.
-
Abstract class (추상 클래스) : 다른 클랙스가 상속받을 수 있는 클래스
직접 인스턴스 생성은 불가.
abstract class User {
constructor (
private firstName:string,
private lastName:string,
public nickName:string
) {}
}
class Player extends User {
}
const nico = new Player("nico", "las", "니꼬");
extends (상속)
Player 클래스는 User의 상속 클래스
-
Abstract Method (추상 메소드) : 추상 클래스 안에서 만들수 있는 메소드
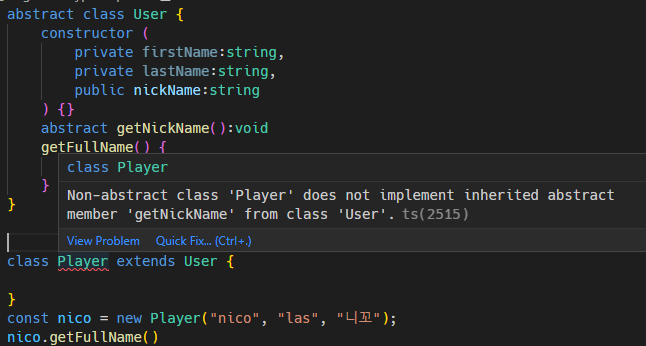
getNickName() 에서 Call Signature 만 있으면 안됨. 위와 같은 에러 발생.
아래처럼 추상 메소드가 있는 경우, 추상 클래스를 상속받는 클래스에서 추상 메소드를 구현해 줘야함.
Player 클래스 안에 getNickName() 구현 부분
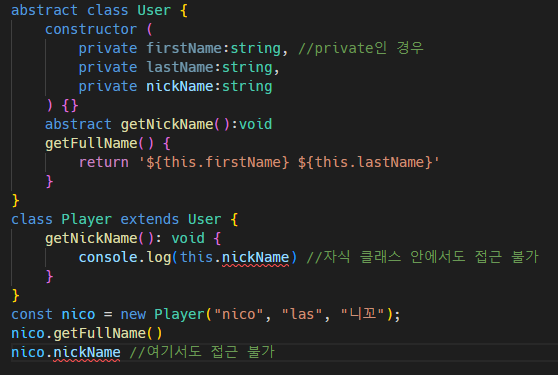
private은 인스턴스 밖에서 접근할 수 없고, 다른 자식 클래스에서도 접근할 수 없음.
-
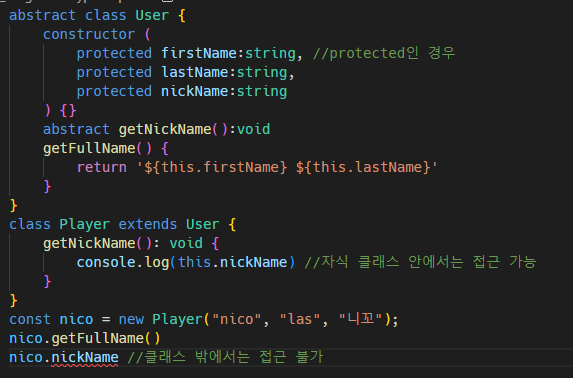
필드가 외부로부터는 보호되지만 다른 자식 클래스에서 사용되기를 원한다면 private을 쓰지말고 protected를 써야함.
클래스 밖에서는 접근 불가,
#4.1 Recap
type Words = { //string만을 property로 가지는 오브젝트
[key:string]: string
//제한된 양의 property 혹은 key를 가지는 타입을 정의해 주는 방법
}
class Dict {
private words:Words
constructor() { //words를 수동으로 초기화
this.words = {}
}
add(word:Word) { //아래 Word 클래스를 타입처럼 사용
if (this.words[word.term] === undefined) {
this.words[word.term] = word.def;
}
}
def(term:string) {
return this.words[term]
}
}
class Word {
constructor (
public term:string,
public def:string
) {}
}
const kimchi = new Word("kimchi", "한국의 음식");
const dict = new Dict();
dict.add(kimchi);
dict.def("kimchi");
실행결과 > "한국의 음식"
-
[Challenge] Dict 사전클래스에서 단어를 수정하고 삭제하는 메소드를 만들고,
Word 단어클래스에서는 출력하거나 하는 함수를 만들어보세요.
type Words = { //Hash: string만을 property로 가지는 오브젝트
[key:string]: string
//제한된 양의 property 혹은 key를 가지는 타입을 정의해 주는 방법
}
class Dict {
private words:Words //create property
constructor() { //words manualy initialize
this.words = {}
}
add(word:Word) {
//word는 Word 클래스의 인스턴스 타입
//Word 클래스를 타입처럼 사용
if (this.words[word.term] === undefined) {
this.words[word.term] = word.def;
}
}
def(term:string) {
return this.words[term];
}
update(word:Word) {
if (this.words[word.term] !== undefined) {
this.words[word.term] = word.def;
}
}
delete(term:string) {
if (this.words[term] !== undefined) {
delete this.words[term];
}
}
static hello() {
return "hello";
}
}
class Word {
constructor (
public readonly term:string,
public readonly def:string
) {}
print() {
console.log('${this.term}:[뜻]${this.def}');
}
}
const kimchi = new Word("kimchi", "한국의 음식");
const dict = new Dict();
dict.add(kimchi);
dict.def("kimchi");
dict.update(new Word("kimchi", "한국의 발효 음식"))
kimchi.print();
dict.delete("kimchi")
Dict.hello();
#4.2 Interfaces
타입은 다양한 방식으로 사용됨.
object 모양을 묘사하는 데에도 사용되고, type alias에 옵션을 넣을 수도 있음.
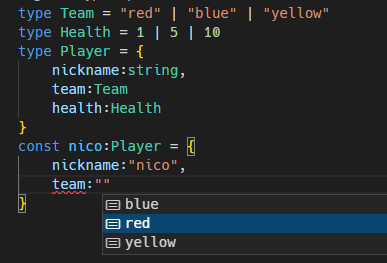
type Team = "red" | "blue" | "yellow"
type Health = 1 | 5 | 10 //type alias 옵션
type Player = { //object 모양을 묘사
nickname:string,
team:Team
health:Health
}
const nico:Player = {
nickname:"nico",
team:"red",
health:5
}
-
object의 모양을 설명하는 다른 방법 => interface (한가지 기능만 함)
약간의 차이점은 있지만 거의 비슷함 (위 코드랑 비교)
type Team = "red" | "blue" | "yellow"
type Health = 1 | 5 | 10 //type alias 옵션
interface Player { //object 모양을 묘사
nickname:string,
team:Team
health:Health
}
const nico:Player = {
nickname:"nico",
team:"red",
health:5
}
-
아래와 같이 클래스처럼 사용 가능. (좀 더 객체지향언어랑 비슷)
interface User {
name:string
}
interface Player extends User {
}
const nico : Player = {
name:"nico"
}
위 코드를 타입으로 사용하면 아래와 같음.
type User = {
name:string
}
type Player = User & {
}
const nico : Player = {
name:"nico"
}
-
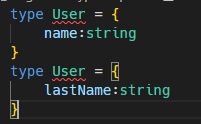
interface는 합체 능력이 있음.
같은 인터페이스에 다른 이름을 가진 property들을 쌓을 수 있음.
interface User {
name:string
}
interface User {
lastName:string
}
interface User {
health:number
}
const nico:User = {
name:"nico",
lastName:"n",
health:10
}
type으로는 불가.
#4.3 Interfaces part Two

추상 클래스에서는인스턴스를 만들 수 없다.
상속받는 클래스가 어떻게 동작해야할지 알려주기 위해 추상클래스 사용.
추상 클래스의문제점은 js에는 abstract가 없다는 것임. 그냥 클래스로 바뀜. 쓸모없는데 js에 남아있는거.
인터페이스는 컴파일하면 js로 바뀌지 않고 사라짐. => 코드가 가벼워짐.
so, 추상클래스를 인터페이스로 바꿔보자.
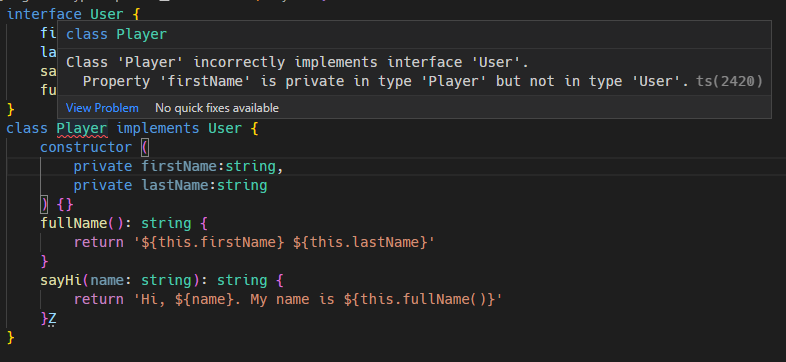
User 인터페이스를 상속하는데 private으로 바꿀수 없다는 에러.
protected도 안됨. User에서 firstName, lastName이 public이기 때문.
interface User {
firstName:string,
lastName:string,
sayHi(name:string):string
fullName():string
}
class Player implements User {
constructor (
public firstName:string,
public lastName:string
) {}
fullName(): string {
return '${this.firstName} ${this.lastName}'
}
sayHi(name: string): string {
return 'Hi, ${name}. My name is ${this.fullName()}'
}Z
}
-
interface는 클래스의 모양을 보여주는데 js 코드로 컴파일되지 않기때문에 가벼워짐.
interface를 상속하는 것의 문제점 중 하나는 private property들을 사용하지 못함.
추상클래스에서는 constructor가 귀찮은 부분을 해주도록 할 수 있었는데,
interface를 사용하게 되면, 이 부분을 해 줄 constructor가 없음.
만약, 원한다면 여러개의 interface를 상속받을 수 있음.
interface User {
firstName:string,
lastName:string,
sayHi(name:string):string
fullName():string
}
interface Human {
health:number
}
class Player implements User, Human {
constructor (
public firstName:string,
public lastName:string,
public health:number
) {}
fullName(): string {
return '${this.firstName} ${this.lastName}'
}
sayHi(name: string): string {
return 'Hi, ${name}. My name is ${this.fullName()}'
}
}
-
interface를 타입으로 사용가능.
return 타입에서도 User로 사용가능.
interface User {
firstName:string,
lastName:string,
sayHi(name:string):string
fullName():string
}
function makeUser(user:User) : User {
return {
firstName:"nico",
lastName:"las",
fullName:() => "x",
sayHi:(name) => "string"
}
}
makeUser({
firstName:"nico",
lastName:"las",
fullName:() => "x",
sayHi:(name) => "string"
})
#4.4 Recap
//type
type PlayerA = {
name:string
}
type PlayerAA = PlayerA & {
lastName:string
}
const playerA:PlayerAA = {
name:"nico",
lastName:"xxx"
}
//interface
interface PlayerB {
name:string
}
interface PlayerB {
lastName:string
}
const playerB: PlayerB = {
name:"nico",
lastName:"xxx"
}
-
if you want, interface & type 둘 다 abstract class를 대체해서 쓸 수 있음.
type PlayerA = {
firstName:string
}
interface PlayerB {
firstName:string
}
class User implements PlayerA/*PlayerB 둘 다 가능*/ {
constructor(
public firstName:string
){}
}

#4.5 Polymorphism
Polymorphism, Generic, Class, Interface를 합쳐 보자.
Polymorphism은 Generic(Placeholder. not concrete)를 사용해서 구현.
다른 모양의 코드를 가질 수 있게 해줌.
TS가 placeholder 타입을 concrete 타입으로 바꿔줌.
같은 코드를 다른 타입에서 쓸 수 있게 해줌.
-
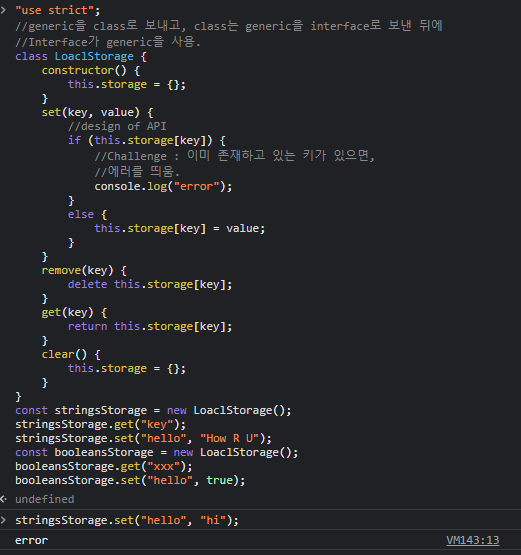
브라우저에서 쓰는 로컬 스토리지 API와 비슷한 API를 가지를 클래스를 만들어 보자.
(일반적으로 JS에서 쓰는)
//기존에 Storage가 정의되어 있음. -> SStorage
interface SStorage<T> {
[key:string]: T
}
//generic을 class로 보내고, class는 generic을 interface로 보낸 뒤에
//Interface가 generic을 사용.
class LoaclStorage<T> {
private storage:SStorage<T> = {}
set(key:string, value:T) {
//design of API
if (this.storage[key]) {
//Challenge : 이미 존재하고 있는 키가 있으면,
//에러를 띄움.
console.log("error");
} else {
this.storage[key] = value;
}
}
remove(key:string) {
delete this.storage[key]
}
get(key:string):T {
return this.storage[key]
}
clear() {
this.storage = {}
}
}
const stringsStorage = new LoaclStorage<string>()
stringsStorage.get("key")
stringsStorage.set("hello", "How R U")
const booleansStorage = new LoaclStorage<boolean>()
booleansStorage.get("xxx")
booleansStorage.set("hello", true)
다음강의 보러가기.
2022.06.16 - [IT] - [Nomad Coders] TypeScript로 블록체인 만들기 #5.0 to #5.4 정리
[Nomad Coders] TypeScript로 블록체인 만들기 #5.0 to #5.4 정리
#5 TYPESCRIPT BLOCKCHAIN #5.0 Introduction #5.1 Targets #Create Typescript Project in VSCode 1. VS Code 에서 폴더를 연다. (folder name : typechains) 2. terminal을 열고 [>npm init -y] 를 입력한다...
ella-devblog.tistory.com
'IT > DEV Study' 카테고리의 다른 글
| [Nomad Coders] TypeScript로 블록체인 만들기 #5.5 to #5.8 정리 (완강) (0) | 2022.06.17 |
|---|---|
| [Nomad Coders] TypeScript로 블록체인 만들기 #5.0 to #5.4 정리 (0) | 2022.06.16 |
| [Nomad Coders] TypeScript로 블록체인 만들기 #3 정리 (0) | 2022.06.15 |
| [Nomad Coders] TypeScript로 블록체인 만들기 #1, #2 정리 (0) | 2022.06.15 |
| [Python] Daily Work Log Program (근무일지 프로그램) 만들기 : ) (0) | 2022.03.25 |