
이전강의 보러가기.
2022.06.16 - [IT] - [Nomad Coders] TypeScript로 블록체인 만들기 #5.0 to #5.4 정리
[Nomad Coders] TypeScript로 블록체인 만들기 #5.0 to #5.4 정리
#5 TYPESCRIPT BLOCKCHAIN #5.0 Introduction #5.1 Targets #Create Typescript Project in VSCode 1. VS Code 에서 폴더를 연다. (folder name : typechains) 2. terminal을 열고 [>npm init -y] 를 입력한다...
ella-devblog.tistory.com
#5.5 Blocks
VSCode 추가로 환경설정 하기
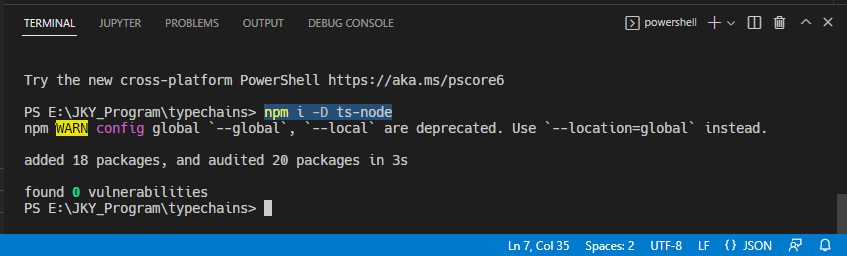
=> ts-node, nodemon 설치하기
package.json "scripts"에 아래와 같이 추가.
"dev": "ts-node src/index",
"start": "node build/index.js"
(확장자는 써도되고, 안써도 됨.)
terminal 에서 [>npm i -D ts-node] 설치
ts-node가 있으면 빌드없이 타입스크립트 실행 가능.
-
package.json "scripts"에 아래와 같이 수정.
"dev": "nodemon --exec ts-node src/index.ts",
(확장자는 써도되고, 안써도 됨.)
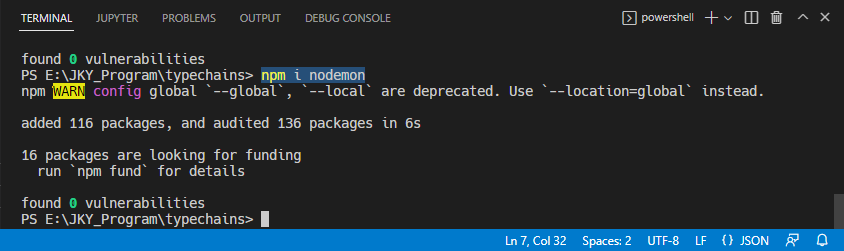
terminal에서 [npm i nodemon] 설치
nodemon 설치하면 자동으로 커맨드를 재실행해줘서, 일일히 커맨드를 다시 실행할 필요가 없음.
서버를 재시작할 필요가 없는 것.
-
[package.json]
{
"name": "typechains",
"version": "1.0.0",
"description": "",
"scripts": {
"build": "tsc",
"dev": "nodemon --exec ts-node src/index.ts",
"start": "node build/index.js"
},
"keywords": [],
"author": "",
"license": "ISC",
"devDependencies": {
"ts-node": "^10.8.1",
"typescript": "^4.7.3"
},
"dependencies": {
"nodemon": "^2.0.16"
}
}
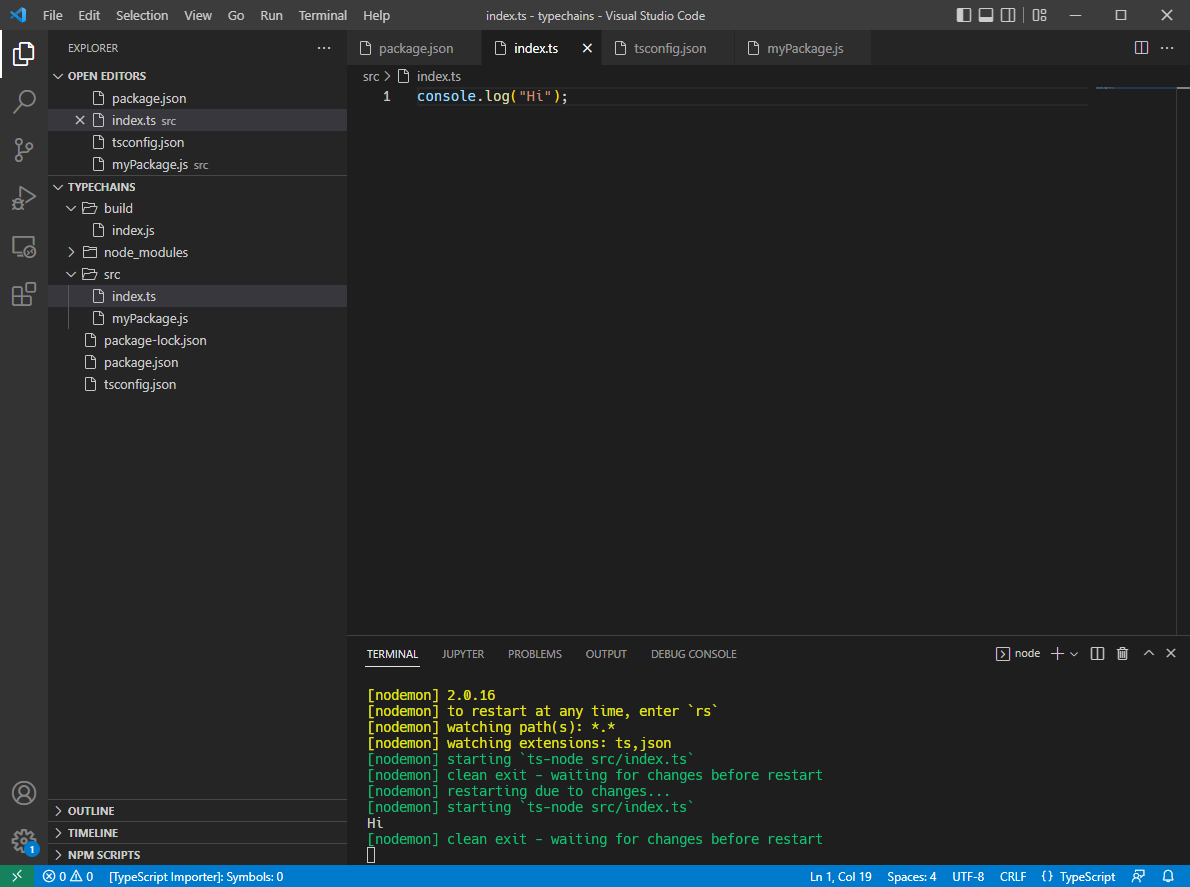
index.ts 수정하면 바로 커맨드 재실행해줌.
=> 환경설정 완료.
본격 블록체인 디자인 해보기.
블록체인 : 여러 개의 블록이 사슬 처럼 묶인 것으로, 블록 안에는 데이터가 들어 있음. 연결고리는 해시값으로 사용.
- 해시값은 123 => awigh4itlaos8dlfalkf 이렇게 지정됨
- 데이터 값이 1234로 바뀌면 해시값도 바뀜.
- 데이터가 바뀌지 않으면 해시값은 그대로.

(참고) static 함수는 클래스 안에서 사용하는 함수,
-> 클래스 인스턴스가 없어도 부를 수 있는 함수. (C# (a.k.a OOP) 이랑 같음)
const p/**Player 클래스의 인스턴스*/ = new Player()
p.kickBall() /**kickBall 함수는 인스턴스가 호출할 수 있는 함수*/
Player.shoot() /**인스턴스가 없어도 부를 수 있는 함수*/
해시값을 불러오려면 node.js의 crypto를 이용해야함
그냥 index.ts 에서 [ import crypto from "crypto"; ] 라고 하면 에러가 남.
[ import * as crypto from "crypto"; ] 로 고치면 에러가 안나는데, 위에꺼 그대로 쓰려면,
tsconfig.json 컴파일옵션에 [ "esModuleInterop" : true ]를 추가해준다.
그리고 [ "allowJs":true ] 설정은 빼줌. (allowJs는 TS와 JS 같이 사용하게 해주는 것.)
Why? => 이러면 에러 발생하는데, #5.6에서 에러 해결방법 설명할 것임. (나는 발생안함. #5.6에서 이미 설치됨.)
[tsconfig.json]
{
"include": ["src"],
"compilerOptions": {
"outDir": "build",
"target": "ES6",
"lib": ["ES6"],
"strict": true,
"esModuleInterop": true,
"module":"CommonJS"
}
}
[index.ts]
import crypto from "crypto";
interface BlockShape {
hash: string; //해시값
prevHash: string; //이전 해시값
height: number; //블록의 위치 표시
data: string; //데이터
}
class Block implements BlockShape {
public hash: string;
//해시값이 아래 prevHash, height, data 값을 통해 계산되어야 함.
constructor (
public prevHash: string,
public height: number,
public data: string
) {
this.hash = Block.calculateHash(prevHash, height, data);
}
static calculateHash(prevHash:string, height:number, data:string) {
const toHash = '${prevHash}${height}${data}';
}
}
#5.6 DefinitelyTyped
=> 타입스크립트에서 발생할 수 있는 에러상황에 대처할 수 있는 방법 설명
위의 타입스크립트에서 "crypto" 타입 정의를 못찾을 때 하는 방법.
저번처럼 일일히 d.ts 파일을 만들고 있을 수 없음.
그래서,,,
DefinitelyTyped (Git Repository)
: npm에 존재하는 거의 모든 패키지의 타입 정의로만 이루어진 레파지토리.
패키지 함수들의 인수, 리턴값 등의 정의만 있고 함수 내용은 없음.
GitHub - DefinitelyTyped/DefinitelyTyped: The repository for high quality TypeScript type definitions.
The repository for high quality TypeScript type definitions. - GitHub - DefinitelyTyped/DefinitelyTyped: The repository for high quality TypeScript type definitions.
github.com
위 레파지토리에서 필요한 것을 보고, 터미널에서 설치하면 된다.
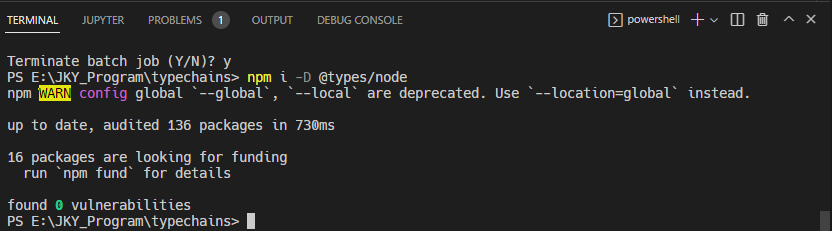
VSCode terminal에서 [>npm I -D @types/node]하면 설치됨.
(nodejs를 위한 타입 정의. 뒤의 node 부분에 자기가 원하는 타입을 적어주면 됨.)
최근에는 일일히 다 해줄 필요는 없고, 없을 때만 해주면 됨. 왠만한건 npm 설치할 때 자동으로 설치됨.
[index.ts]
import crypto from "crypto";
interface BlockShape {
hash: string; //해시값
prevHash: string; //이전 해시값
height: number; //블록의 위치 표시
data: string; //데이터
}
class Block implements BlockShape {
public hash: string;
//해시값이 아래 prevHash, height, data 값을 통해 계산되어야 함.
constructor (
public prevHash: string,
public height: number,
public data: string
) {
this.hash = Block.calculateHash(prevHash, height, data);
}
static calculateHash(prevHash:string, height:number, data:string) {
const toHash = '${prevHash}${height}${data}';
return crypto.createHash("sha256").update(toHash).digest("hex");
}
}
#5.7 Chain
본격 블록체인 만들기
[index.ts]
import crypto from "crypto";
interface BlockShape {
hash: string; //해시값
prevHash: string; //이전 해시값
height: number; //블록의 위치 표시
data: string; //데이터
}
class Block implements BlockShape {
public hash: string;
//해시값이 아래 prevHash, height, data 값을 통해 계산되어야 함.
constructor (
public prevHash: string,
public height: number,
public data: string
) {
this.hash = Block.calculateHash(prevHash, height, data);
}
static calculateHash(prevHash:string, height:number, data:string) {
const toHash = '${prevHash}${height}${data}';
return crypto.createHash("sha256").update(toHash).digest("hex");
}
}
class BlockChain {
private blocks: Block[]
constructor() {
this.blocks = [];
}
private getPrevHash() {
if (this.blocks.length === 0) return ""
return this.blocks[this.blocks.length - 1].hash;
}
public addBlock(data: string) {
const newBlock = new Block(this.getPrevHash(), this.blocks.length + 1, data);
this.blocks.push(newBlock);
}
public getBlocks() {
return this.blocks;
}
}
const blockchain = new BlockChain();
blockchain.addBlock("First one");
blockchain.addBlock("Second one");
blockchain.addBlock("Third one");
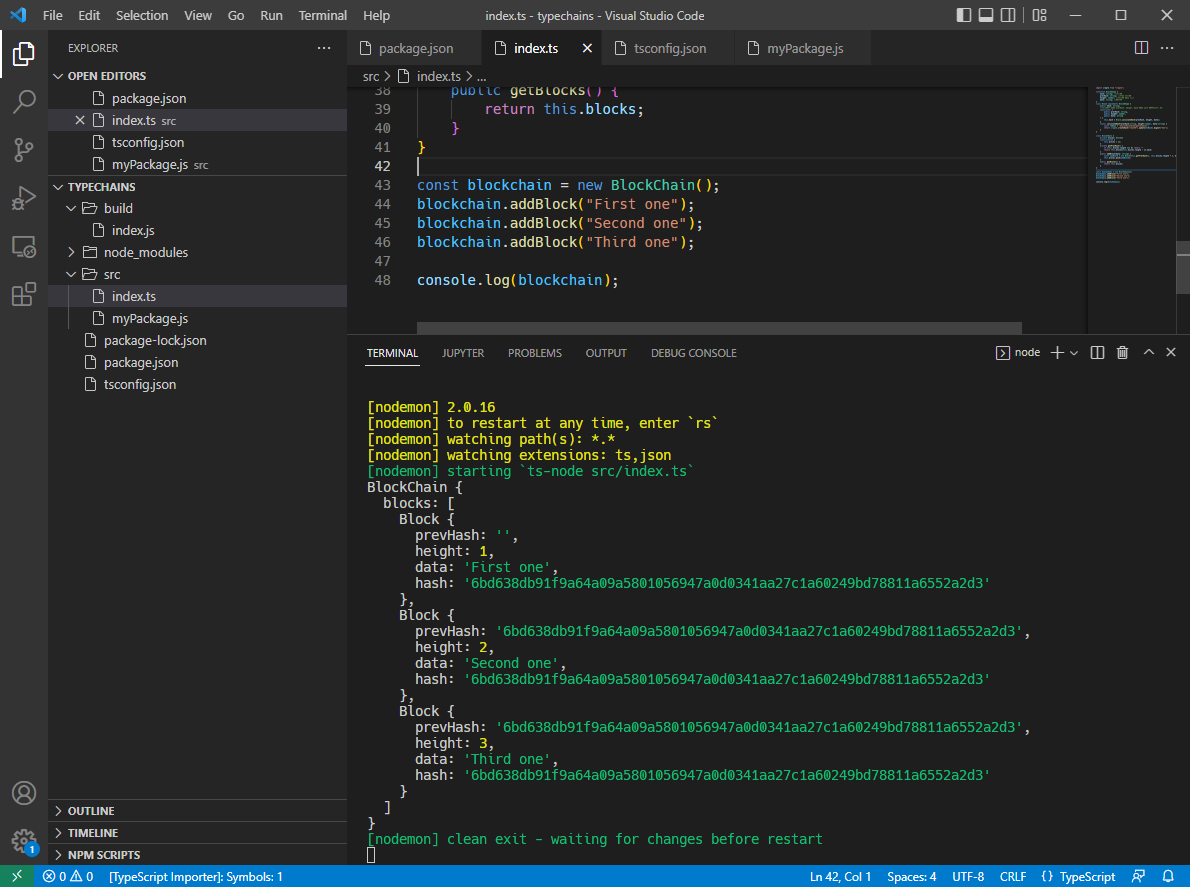
console.log(blockchain.getBlocks());
실행결과
그런데, 이렇게 하면 보안 문제가 있음. 두둥!
누구나 내 블록체인에 새로운 블록을 추가할 수 있다는 문제!
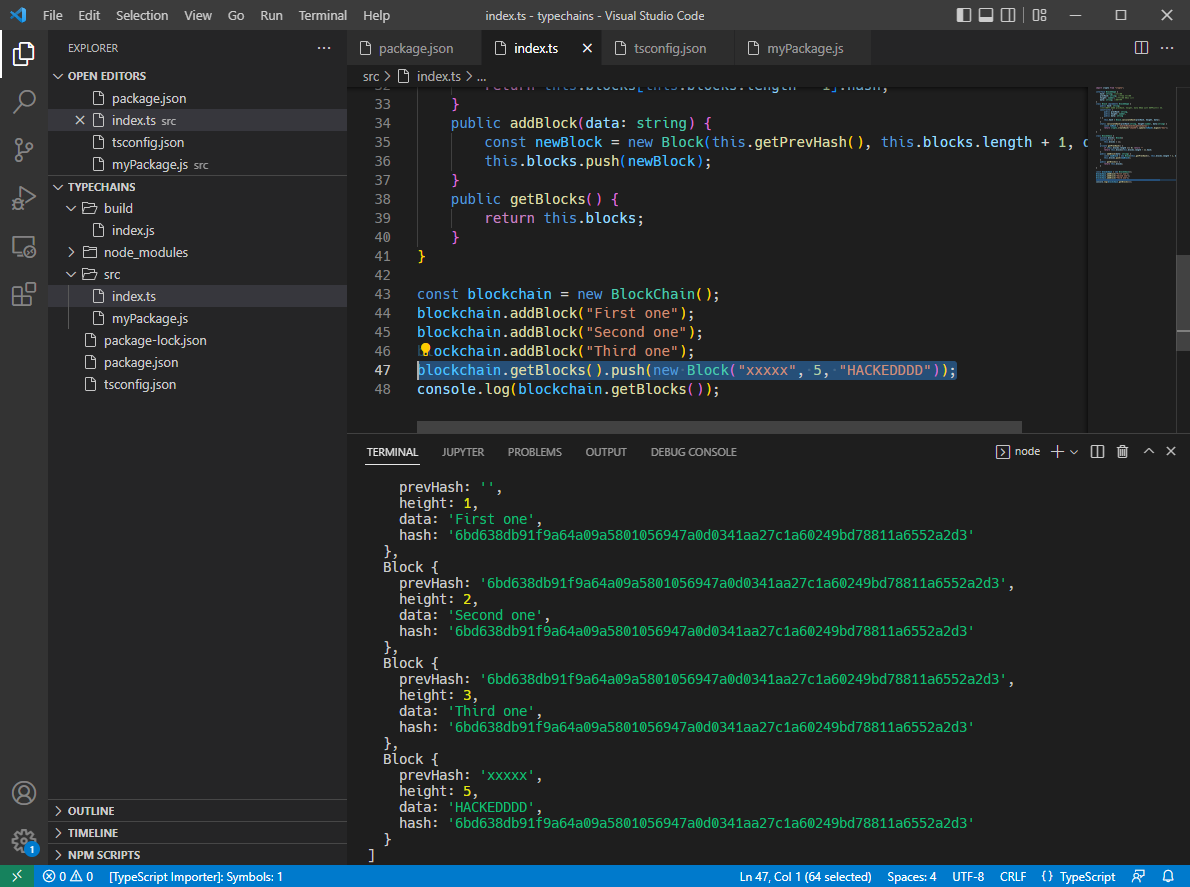
GetBlocks() 에서 블록을 다 리턴하기 때문에, 누가 새로운 것을 추가할 수도 있는 문제임.
HACKEDDD!!!
=> 그래서 리턴값을 바꿔서, 아래처럼 해주면,,,
(배열 안에 있는 데이터를 가진 새로운 배열을 리턴해주면,,,)

위 결과값 처럼 push가 안먹히는 것을 볼 수 있음.
OKAYYY!!!
[index.ts]
import crypto from "crypto";
interface BlockShape {
hash: string; //해시값
prevHash: string; //이전 해시값
height: number; //블록의 위치 표시
data: string; //데이터
}
class Block implements BlockShape {
public hash: string;
//해시값이 아래 prevHash, height, data 값을 통해 계산되어야 함.
constructor (
public prevHash: string,
public height: number,
public data: string
) {
this.hash = Block.calculateHash(prevHash, height, data);
}
static calculateHash(prevHash:string, height:number, data:string) {
const toHash = '${prevHash}${height}${data}';
return crypto.createHash("sha256").update(toHash).digest("hex");
}
}
class BlockChain {
private blocks: Block[]
constructor() {
this.blocks = [];
}
private getPrevHash() {
if (this.blocks.length === 0) return ""
return this.blocks[this.blocks.length - 1].hash;
}
public addBlock(data: string) {
const newBlock = new Block(this.getPrevHash(), this.blocks.length + 1, data);
this.blocks.push(newBlock);
}
public getBlocks() {
return [...this.blocks];
}
}
const blockchain = new BlockChain();
blockchain.addBlock("First one");
blockchain.addBlock("Second one");
blockchain.addBlock("Third one");
blockchain.addBlock("Fourth one");
console.log(blockchain.getBlocks());
#5.8 Conclusions
타입스크립트에 대해 더 배우고 싶으면
The TypeScript Handbook을 참고해주세요 : )
그리고,
강의 다 듣고 추가로 더 공부하고 싶으면, 위에 있는 Course 수강하면 좋다고 하는데
위에 있는 강의들은 다 유료 강의다.
나는 가난한 개발자로써, 무료 강의를 선호하기 때문에..
다음 강의는 NestJS로 API 만들기 강의를 수강하려 한다.
조만간 강의 정리 포스팅으로 다시 돌아온다.
피쓰.
'IT > DEV Study' 카테고리의 다른 글
| [Nomad Corders] NestJS로 API 만들기 #0, #1 정리 (2) | 2022.07.25 |
|---|---|
| [TypeScript] 작은 따옴표(')와 백틱(`)을 구분 못한 바보의 한탄 TT (421) | 2022.07.11 |
| [Nomad Coders] TypeScript로 블록체인 만들기 #5.0 to #5.4 정리 (0) | 2022.06.16 |
| [Nomad Coders] TypeScript로 블록체인 만들기 #4 정리 (0) | 2022.06.16 |
| [Nomad Coders] TypeScript로 블록체인 만들기 #3 정리 (0) | 2022.06.15 |